Catastrophic failure of a critical piece of air handling equipment can be devastating.
Unexpected fan failures on chillers, fume scrubbers, baghouses, oxidizers, industrial ovens and furnaces, conveying systems, and so forth, can not only shut down a critical process, but also garner the attention of federal and state watchdogs like the Occupational Safety and Health Administration (OSHA), Environmental Protection Agency (EPA) and Department of Natural Resources (DNR).
While the loss of conditioned air can irritate office workers, the loss of a process fan can halt production.
Do you have a comprehensive preventive maintenance program that covers routine servicing of this type of equipment?
Typically, periodic greasing, good alignment and dynamic balancing ensure these types of equipment run for a long time. Unfortunately, fans are often placed in difficult to access and out of sight locations – outside, on the roof, atop mezzanines or even within process equipment, making routine maintenance difficult to perform and easy to overlook.
Failure can happen at any time and for many reasons. But what happens when fan failure occurs?
The production line is down, and everyone knows it; not just your immediate boss, everyone. Having a plan in place reduces stress and more important, corrective action can start immediately.
Assess the situation
Identify the fan and lockout, tagout (LOTO). Is there collateral damage to the electrical feed, building, near-by equipment or product? Notify relevant departments.
Do you have a file or other information on hand for this asset regarding manufacturer, model, serial number, bearings, motor, drive components and other relevant parameters? If you do, verify the information. If you don’t, see if you can find it. Many fans operating for a long-time will lack vital information because of missing or obliterated identification tags. Assume this is the case here.
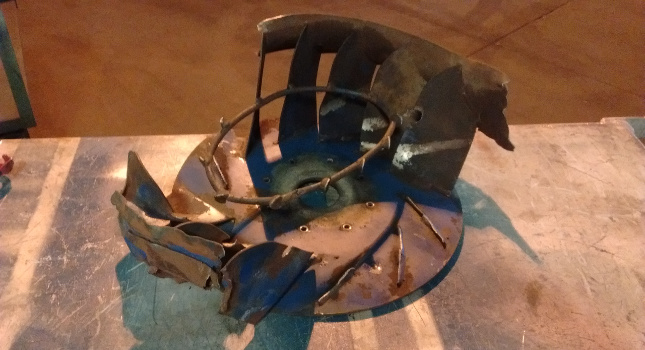
Visual inspection. Let’s say the unit has failed bearings, a damaged shaft and drive belts that are no longer on the sheaves. You see the back plate of the impeller with most of its blades ripped off and lying on the bottom of the fan housing. The inlet cone is badly dented and ripped half-way around its circumference (see Figure 1).
Figure 1: Badly damaged fan impeller. Courtesy: Holming Fan & Fabrication LLCAction plan. Mobilize your maintenance mechanics and electricians. Start the disassembly process. Record the bearing, belt and sheave numbers for purchasing to start the procurement process. If no identifying tags are on the fan and if the lead-time to specify, procure and install a replacement impeller from the original equipment manufacturer (OEM) is prohibitive, search the internet for someone with the experience to repair or fabricate a replacement hub, impeller, inlet cone and shaft immediately.
Once you find a qualified impeller fabricator who understands the meaning of “we’re down,” collect all remaining pieces of the fan wheel, hub assembly, inlet cone and shaft and send them by dedicated truck to the fabricator.
Keep in constant contact with the fabricator for progress updates that can be relayed to personnel in-house. It’s vital to know timing and how the fabricator goes about doing its job. If necessary, visit the fabricator as often as necessary and be sure to ask if the impeller will be dynamically balanced before leaving the shop.
Assembly: Once the balanced replacement impeller, new shaft and inlet cone from the fabricator are complete and back at your plant, you’re ready to begin assembly. (see Figure 2) Newly purchased bearings and drive components have arrived. Any damage to the fan housing and bearing pedestal was repaired while the wheel was being fabricated. You are now ready to assemble – or are you?
Figure 2: When the balanced replacement impeller, new shaft and inlet cone from the fabricator are complete and back at your plant, you’re ready to begin assembly. Courtesy: Holming Fan & Fabrication LLCAssembly is far different than disassembly. Bearings and drive components must be properly aligned and set up. If not, longevity can be compromised. Also, alignment and set up clearance between the impeller inlet collar and inlet cone is crucial for optimal performance. After all you’ve been through up to this point, give serious consideration before attempting this task on your own. It’s usually better to leave final assembly to the experts.
After assembly is complete and checked, the rotating mass should be analyzed, and dynamic balance trimmed in if necessary. Even though the wheel was dynamically balanced at the fabricator, balance should be rechecked and trimmed, especially with the drive components added to the rotating mass.
A sigh of relief
Congratulations, you made it through the crisis with minimal downtime. Lost production time due to a process fan failure is never good, but what you do after it happens can make all the difference. It’s better to have a plan and not need it than not have a plan when catastrophe strikes.
Take a deep breath, but you’re not done yet. Now’s a good time to revisit your critical fan preventive maintenance schedule and list. Do a walk-through to be sure all fans are on the schedule. Update any missing information. With that done, you can attend to the grumpy office dwellers, should there be any.